How to draw a turtle — easy step by step drawing ideas
If you're gathering turtle drawing ideas for a young artist, you've picked the friendliest reptile in the building. Learning how to draw a turtle is classic beginner territory: a turtle is a hill, a line, a head and four stumps — shapes so simple you can teach them to a five-year-old before snack time, with a pattern on top that's pure play.
Turtles also come with the best built-in lesson in art class: slow is fine. The animal itself takes its time, and so can you. Nothing in this tutorial needs a fast line or a steady wrist, and a slightly lumpy shell honestly looks more like a real turtle than a perfect one does.
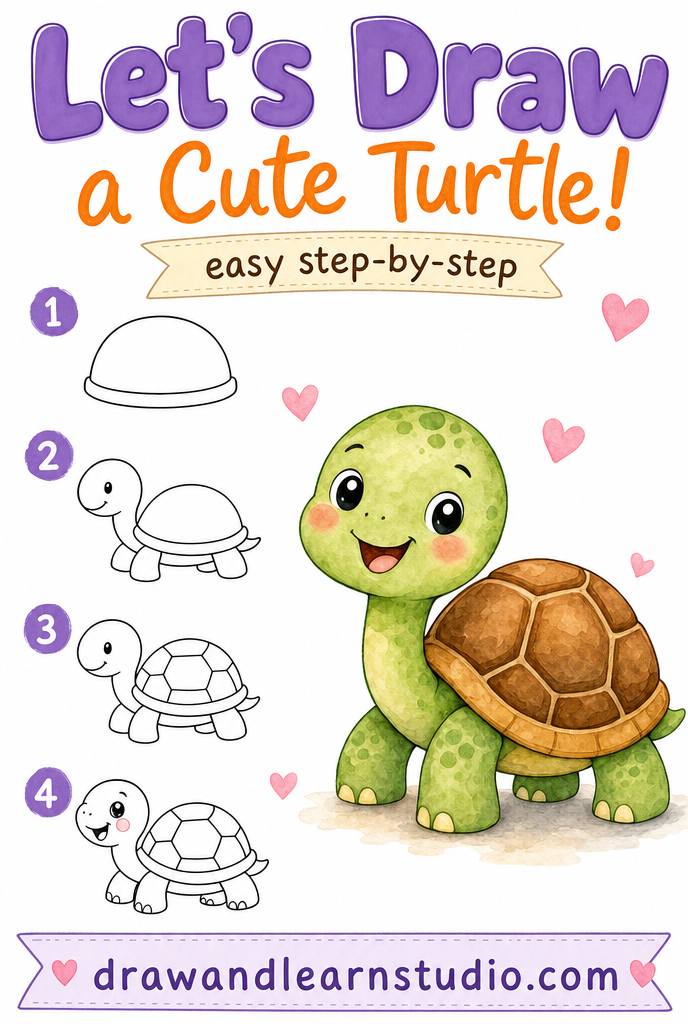
We'll build our turtle in six easy steps, each with a picture right under it so you can compare as you go. Along the way I'll share the pro tips I use in workshops, the common wobbles to avoid, and quick fixes for when something looks off. Pencil ready? Let's draw the most patient animal on the site.
⏱️ Time: 15–20 minutes
⭐ Difficulty: beginner — great for kids 5+
✏️ Materials: pencil, eraser, paper, green and brown crayons or markers
Turtle drawing ideas: the 6 easy steps
Step 1 — Draw the shell dome

Start with a big half-circle in the middle of your paper, like a hill or an upside-down bowl. Press lightly — this is the scaffolding stage, and you'll darken only your favorite lines at the end. Make the dome generous; the shell is the turtle's house, its umbrella and its whole personality, so give it room.
Leave space below the dome for the belly line and legs, and a little space in front for the head. If your hill leans slightly to one side, leave it — a tilted shell makes the turtle look like it's mid-stroll, which is exactly the energy we want.
Step 2 — Close the shell

Connect the two ends of your dome with a gently curved line along the bottom — flat-ish, with just a little smile of a curve. Your hill is now officially a shell. Then add a second line just above the bottom one, following it from end to end: that narrow band is the shell's rim, the "skirt" that real shells have.
That little rim stripe is a small line with a big job: it instantly makes the shell look thick, sturdy and three-dimensional instead of like a sticker. It's the single most professional-looking trick in this whole tutorial, and it's just a second line.
Step 3 — Add the head

From the front of the shell, draw a rounded head poking out and slightly up — like a thumb or a rounded sock. Attach it at the rim so it looks like the head is coming from inside the shell, not stuck onto the outside of it. Keep the neck short and thick; long skinny necks drift toward "confused snake in a helmet."
Make the head big for maximum cuteness — about a third the height of the shell. Big head, tiny shell-house, permanent smile: that's the winning cartoon turtle recipe used by every picture book you've ever loved.
Step 4 — Add the legs and tail

Under the shell, add four sturdy little legs — each one a short, rounded stump, like the legs of a very small table. Two in front, two in back, with the far-side legs peeking out just a bit shorter behind the near ones. No knees, no toes needed — round stumps read perfectly as turtle legs.
At the back, add a tiny pointed tail poking out from under the rim — one small triangle, and somehow the whole drawing gets 20% more charming. Check that all four feet touch the same imaginary ground line so your turtle stands steady on the page.
Step 5 — Shell pattern and face

Decorate the shell with a few big rounded shapes — circles, soft squares or hexagon-ish blobs — scattered across the dome with breathing room between them. Three to five shapes is plenty. Cartoon shell patterns are a suggestion, not a math assignment; big and few always beats small and many.
Then the face: one big round eye (or two, if your turtle faces forward) placed low on the head, filled dark with a white sparkle circle left inside, and a wide happy smile curving along the bottom of the head. Add a tiny dot nostril, and your turtle officially has an inner life.
Step 6 — Finish and color

Go over your favorite lines with darker pressure or a fine marker, and gently erase the leftover scaffolding — especially where the legs and head meet the shell. This is the ten seconds where the construction shapes disappear and a real little turtle is suddenly standing there, mid-stroll, pleased with itself.
Classic coloring: warm brown or tan shell with slightly darker pattern shapes, and fresh green head, legs and tail. Keep the rim band lighter for contrast. Or go bold — teal shell, lime body, purple pattern. Turtles carry their houses; they can paint them however they like. A few grass tufts under the feet finish the scene beautifully.
Common mistakes to avoid
Making the shell too flat
A low, flat dome turns your turtle into a pancake with a head. The shell should be a proper hill — roughly half as tall as it is wide, with a confident rounded top.
If your dome came out flat, don't erase it: draw a taller arc above the existing one and erase the lower line after. Shells only ever need to grow upward.
Overcrowding the shell pattern
Twenty tiny hexagons make the shell look busy and take forever, and young artists run out of patience halfway through. Then the shell is half-covered and everyone's sad.
Three to five big rounded shapes with space between them gives the storybook look in thirty seconds. If your artist loves detail, let them add more after coloring — pattern on top of color is a bonus round, not a requirement.
Sticking the head on the outside of the shell
A head attached to the front edge of the shell like a doorknob looks pasted on. The head should emerge from under the rim, with the shell slightly overlapping where the neck disappears inside.
The fix is one small line: extend the shell rim so it overlaps the top of the neck. Instantly the head lives inside the house instead of being taped to it.
Troubleshooting
"My turtle looks like a rock with legs"
The head is probably too small or the face too plain. Enlarge the head, place the eye low with a big white sparkle, and stretch the smile wider. A rock becomes a turtle the moment it looks happy to see you.
"The legs ended up different sizes"
Totally normal — and honestly fine, since real turtle legs rarely line up neatly. If it bothers you, fix only the most different-looking leg rather than redrawing all four. And check the feet: as long as all four touch the same ground line, uneven thickness reads as personality.
"The shell pattern went wonky"
Wonky pattern shapes are the most fixable thing on the page: erase just the shape you dislike and redraw it — the pattern isn't structural, so nothing else moves. Or lean in: color each wonky shape a different shade and call it a mosaic shell. Nobody has ever argued with a mosaic turtle.
Key takeaways
- A turtle is a hill, a line, a head and four stumps — the friendliest shape kit in drawing.
- The rim line under the dome is the one-second trick that makes the shell look real and sturdy.
- Big head, low sparkly eye, wide smile: the cartoon cuteness formula works on reptiles too.
- Keep legs short and stumpy, all four feet on the same ground line.
- Shell pattern: three to five big rounded shapes with breathing room — suggestion, not geometry.
- Slow is fine. It's a turtle. Draw light until step 6, then commit with your best dark lines.
FAQ
What age is this turtle drawing tutorial for? Kids 5 and up can follow it with a little help, and children around 7+ usually manage all six steps on their own. The turtle is one of our most forgiving tutorials — every shape in it is big and slow, just like the turtle.
How do I make the shell pattern look right? Keep it simple: a few big rounded shapes in the middle of the shell with space between them beats lots of tiny accurate hexagons. Cartoon shells are about the suggestion of a pattern, not a geometry lesson.
What materials do we need? Just a pencil, an eraser and paper. Green and brown crayons make the classic turtle coloring, but a purple-shelled turtle has never hurt anyone.
What's the difference between drawing a turtle and a tortoise? For a cartoon it's mostly the legs: sea turtles get flat flippers, tortoises get sturdy round stumpy legs. Our tutorial draws the friendly stumpy-leg version, which is the easiest for beginners.
Keep drawing! 🐢
If your young artist is hooked, our step-by-step drawing book is the top pick in our studio — 320 animals taught in the same easy 6-step style as this tutorial. Pair it with a chunky set of washable markers and a spiral sketchpad (spiral bindings lie flat, which little hands love), and quiet afternoons take care of themselves.
Get the book on AmazonAnd there it is — a sturdy, smiling turtle carrying its hand-decorated house across your paper at exactly the right speed. Hang it up, draw it a pond tomorrow, and take the turtle's advice with you: one easy line at a time gets you all the way there.
More tutorials: All tutorials · How to draw a frog · How to draw a whale · How to draw a ladybug