How to draw a ladybug — easy step by step drawing ideas
If you're hunting for ladybug drawing ideas that actually work for little hands, you've landed in the right garden. Ladybugs are my favorite "first bug" to teach, because underneath those famous spots a ladybug is really just two circles and a line — and I've watched five-year-olds nail it on their very first try. Learning how to draw a ladybug is one of those small wins that makes kids want to keep drawing all afternoon.
I remember the first time I drew one with my niece: she was convinced bugs were "too hard," and twenty minutes later she had a whole ladybug family marching across the page, each one with a different number of spots and a different mood. That's the magic of this little beetle — once the basic shape clicks, the variations are endless and every single one looks charming.
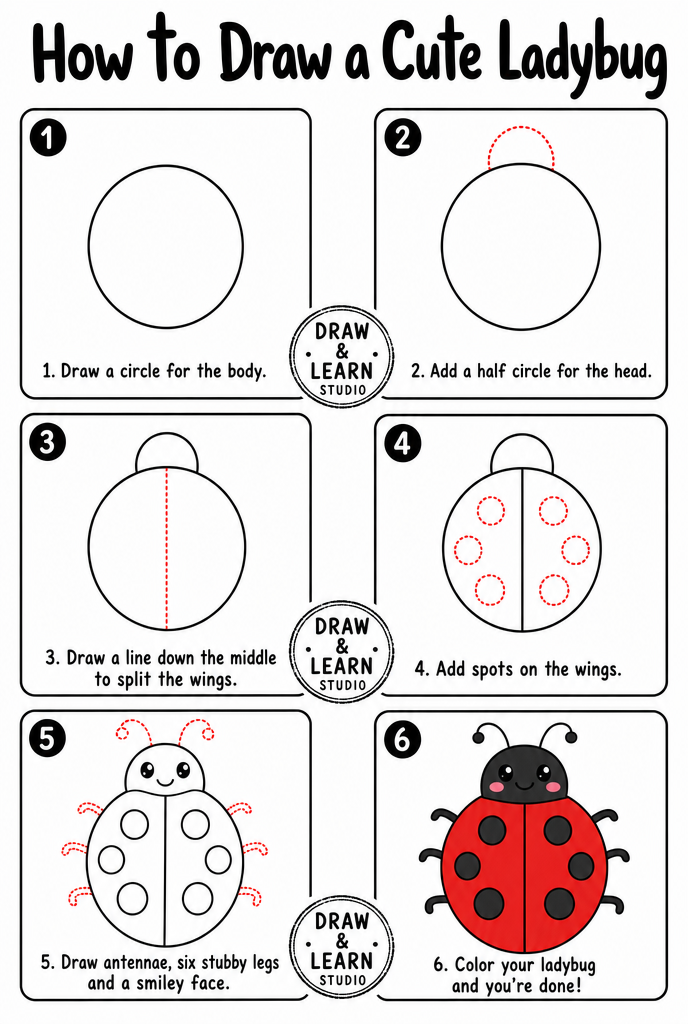
In this tutorial we'll build our ladybug in six easy steps, exactly like the practice sheet below. I'll share the pro tips I give in real workshops, the mistakes I see most often (and how to dodge them), and some fixes for when things go wobbly. Grab a pencil and something red, and let's draw.
⏱️ Time: 15–20 minutes
⭐ Difficulty: beginner — great for kids 5+
✏️ Materials: pencil, eraser, paper, red and black crayons or markers
The 6 steps to a cute ladybug drawing
Step 1 — Draw the body circle

Start with one big circle right in the middle of your paper, maybe a touch below center so there's room for the antennae later. This circle is the ladybug's whole body, so make it generous — tiny circles lead to cramped spots and squished faces. Keep your pencil lines light and loose; think of this as the "sketchy whisper" stage where nothing is permanent yet.
Don't worry if your circle looks more like a potato. Real ladybugs aren't perfect circles either — they're slightly dome-shaped, a little wider than they are tall. Draw the circle two or three times lightly on top of itself and keep the version you like best.
Step 2 — Add the head

Tuck a small half-circle onto the top edge of the body, like a little helmet peeking over the big circle. The head should be much smaller than the body — about a quarter of the width is perfect. Ladybugs are mostly wing, and keeping the head small is what makes the drawing instantly read as "ladybug" instead of "mystery beetle."
Position matters more than perfection here. Center the head on the top of the circle, and let it overlap the body line slightly. Later you'll erase the little seam where they meet, and the two shapes will look like one smooth bug.
Step 3 — Split the wings

Draw one straight vertical line from the base of the head right down the middle of the body to the bottom of the circle. That single line transforms your circle into two wing covers — the shiny red shells (their fancy name is elytra) that ladybugs are famous for. It's amazing how much work one line does.
If straight lines are tricky, rotate the paper so you're pulling the pencil toward you rather than pushing it sideways — hands are much steadier that way. A gently curved line is totally fine too; it makes the ladybug look like it's about to take off.
Step 4 — Add the spots

Now the fun part: spots! Draw three round spots on each wing — six total is the classic look. Vary the sizes a little (one big, one medium, one small per side) and keep them away from the edges so they don't look like they're sliding off. Spots that mirror each other across the center line give the tidiest, most "storybook" ladybug.
There's no wrong number of spots, though. Real ladybugs come with anywhere from two to twenty-four, so if your artist wants a seven-spot ladybug or a two-spot minimalist, science is on their side. Just keep the spots round-ish and roomy.
Step 5 — Face, antennae and little legs

Give the head two dot eyes and a small smile — instant personality. Then add two short antennae sticking up from the top of the head, each ending in a tiny ball, like two little lollipops. Finally, add three short stick legs on each side of the body, poking out from under the shell.
This is the step where your ladybug stops being shapes and becomes a character. Big eyes low on the head read as "baby cute"; small eyes high up read as "serious garden professional." Try both on scrap paper and let your artist pick the personality.
Step 6 — Finish and color

Darken your favorite lines, erase the light scaffolding underneath, and bring out the colors: bright red wings, black spots, black head. Press gently in layers rather than scrubbing hard — two light passes of crayon look smoother than one heavy one, and the paper won't wrinkle.
Want to level it up? Leave a tiny white circle unshaded on each wing as a "shine spot," and add a squiggle of green grass under the feet. Suddenly your ladybug lives somewhere. Sign your name — every finished drawing deserves a signature.
Common mistakes to avoid
Making the head too big
The number-one ladybug wobble: a head half the size of the body turns the ladybug into a strange red turtle. The head should be a small bump — about a quarter of the body's width.
If it happens, don't erase everything. Just redraw the body circle a little bigger around the original, and the proportions fix themselves. Bigger body beats smaller head every time.
Crowding the spots at the edges
Spots placed right on the outline look like they're falling off the bug, and they get chopped weirdly when coloring. Keep every spot fully inside its wing with a little breathing room.
A quick fix: place spots starting from the center line and work outward. The center of each wing is prime spot real estate; the edges are the danger zone.
Pressing too hard too early
Dark, heavy pencil lines in steps 1–3 are almost impossible to erase, and every ladybug needs a little adjusting along the way. Sketch light, like the pencil is barely awake.
If the lines are already dark, press a kneaded eraser (or a regular one, gently rolled) onto them instead of rubbing — it lifts graphite without tearing the paper.
Troubleshooting
"My circle is lumpy!"
Lumpy circles are normal — even professionals draw circles in two or three light passes. Rotate your paper as you draw so your wrist moves in its comfortable arc, or trace something round. And remember: a slightly lumpy ladybug looks hand-made in the best way.
"The two wings look uneven"
Turn the paper upside down — instantly you'll see which wing is bigger, because your brain stops "auto-correcting" the familiar view. Add a sliver to the smaller wing rather than shaving the bigger one. Nobody measures a ladybug.
"The spots turned into blobs when I colored"
Marker spots bleed if the paper is thin or the red underneath is still wet. Color the red wings first, let them dry a minute, then add black spots with a crayon or colored pencil instead of marker. Crayon on top of marker behaves much better than marker on marker.
Key takeaways
- A ladybug is just a big circle, a small half-circle head, and one line down the middle — everything else is decoration.
- Keep the head small: about a quarter of the body width keeps the "cute bug" proportions.
- Sketch every step lightly first, then darken only your favorite lines at the end.
- Three spots per wing is classic, but any number works — vary sizes for charm.
- Color in light layers, red first, spots after it dries.
- Drawing the same ladybug three times is the fastest way to get visibly better today.
FAQ
What age is this ladybug drawing tutorial for? The six-step version works for ages 5 and up with a bit of help, and kids around 7+ can follow the sheet independently. Adults looking for relaxing drawing ideas are very welcome too.
How many spots should a ladybug drawing have? Six (three per wing) is the classic storybook look. Real ladybugs range from two spots to over twenty, so there's no wrong answer — just keep them round and away from the edges.
What materials do we need? Just a pencil, an eraser, paper, and something red and black to color with. Crayons are the most forgiving for young kids; markers make the boldest, brightest bugs.
My child gets frustrated when it looks "wrong." Any advice? Draw alongside them and make your own ladybug charmingly imperfect on purpose. Praise specific choices ("I love how big that spot is!") rather than accuracy, and remember the three-times rule: bug #3 always beats bug #1.
Keep drawing! 🐞
If your young artist is hooked, our step-by-step drawing book is the top pick in our studio — 320 animals taught in the same easy 6-step style as this tutorial. Pair it with a chunky set of washable markers and a spiral sketchpad (spiral bindings lie flat, which little hands love), and quiet afternoons take care of themselves.
Get the book on AmazonThat's your ladybug! Whether it came out storybook-neat or wonderfully wobbly, you made a bug from two circles and a line — and that deserves a spot on the fridge. Keep the sheet handy, draw a whole ladybug family, and come back tomorrow for a new tutorial.
More tutorials: All tutorials · How to draw a dolphin · How to draw a cat · How to draw an elephant