How to draw an elephant — easy step by step drawing ideas
Hunting for elephant drawing ideas that don't collapse under all those wrinkles and legs? You're in exactly the right place. Elephants look like a big drawing challenge — they're the biggest land animal, after all — but here's the secret I tell every workshop: an elephant is just a potato with a slide attached. One big potato body, one smooth trunk-slide, some column legs, and suddenly learning how to draw an elephant is the gentlest big-animal lesson there is.
Kids adore elephants, and honestly, so do I. They're gentle, they're smart, they remember everything, and they give themselves dust baths like it's a spa day. Elephants are also wonderfully forgiving to draw — their shapes are so big and soft that wobbly lines just look like friendly wrinkles. If there was ever a confidence-building animal, it's this one.
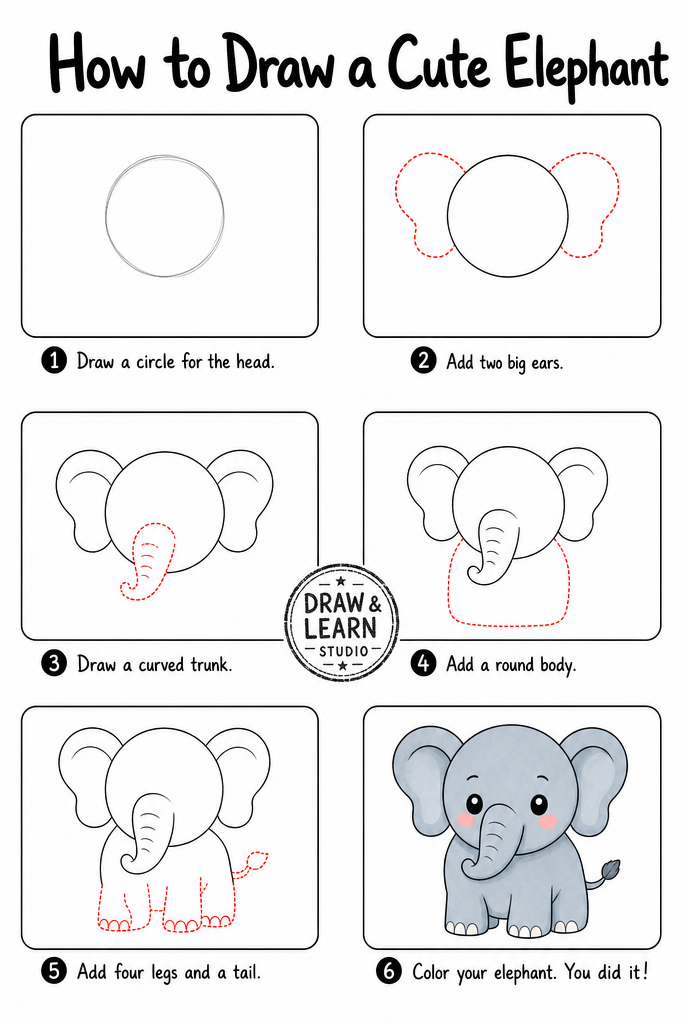
We'll build our elephant in six easy steps, following the sheet below panel by panel. Along the way I'll share pro tips, the classic mistakes to dodge, and quick fixes for the usual wobbles. Pencil up — let's draw something enormous.
⏱️ Time: 15–20 minutes
⭐ Difficulty: beginner — great for kids 5+
✏️ Materials: pencil, eraser, paper, gray and pink crayons or markers
The 6 steps to a cute elephant drawing
Step 1 — Draw the big round body

Start with the biggest, friendliest potato shape you can manage, sitting across the middle of your paper. Wider than it is tall, round on top, gently flat underneath — that's the elephant's whole body, and it should take up a lot of the page. Elephants are large; your drawing is allowed to be too.
Sketch lightly and don't fuss over smoothness. A slightly lumpy potato is actually perfect here, because elephants are slightly lumpy animals — this is the one drawing where wobbles work in your favor.
Step 2 — Add the head and trunk

Draw a round head shape overlapping the front of the body — about half the body's size, like a satsuma leaning on the potato. Then comes the elephant's signature: the trunk. From the front of the head, sweep two gently curving parallel lines down and slightly outward, letting them taper as they go, and close them with a soft rounded tip that curls up just a little at the end.
Think of the trunk as a playground slide: smooth, curved, and inviting. Two relaxed lines beat ten careful ones, so draw the curves with a loose wrist and re-stroke lightly if needed.
Step 3 — Big floppy ears

Elephant ears are enormous, and they're the step where your drawing suddenly becomes an elephant. On the side of the head, draw one huge floppy shape like a giant leaf or a slightly squashed heart — it can be nearly as big as the head itself. Add a soft line inside following the outer edge to give the ear its inner rim.
Since our elephant is standing side-on, one big ear does the work; if your elephant faces forward, give it two. Wavy edges make the ear look soft and floppy — crisp straight edges make it look like a kite, and elephants famously dislike being kites.
Step 4 — Sturdy legs and toenails

Elephants stand on columns, not legs — so draw four thick, straight shapes coming down from the body like sturdy table legs, flat at the bottom. Two in front, two behind, with the far-side pair peeking out slightly behind the near ones. No knees, no ankles, no fuss.
Then the detail everyone loves: toenails. Add two or three rounded bumps at the bottom of each leg, like little half-moons. Toenails are the tiny touch that makes every studio elephant look instantly professional — kids gasp about this trick every single time.
Step 5 — Tail and happy face

At the back of the potato, add a thin little tail hanging down with a small tuft at the end, like a paintbrush that came free with the elephant. Then bring the face to life: one big kind eye on the head (elephants have famously gentle eyes, so draw it round with a sparkle), a rosy blush circle beneath it, and a small smile curve right where the trunk meets the face.
You can add one or two short curved lines across the trunk to suggest its soft ridges, and a couple of small wrinkle lines by the knees — three wrinkles maximum, though. We're drawing a cute elephant, not filing a dermatology report.
Step 6 — Finish and color

Darken your favorite lines, erase the light sketch underneath, and color: soft gray over the body, head, trunk and legs, warm pink inside the ear, and white for the toenails. Color in light circular strokes and layer gently — soft layers give that lovely velvety elephant-skin look that one hard scrub never will.
For a full scene, add a sunny sky, a water hole with a splash from the trunk, or a tiny bird friend perched on the elephant's back. Then sign your work with pride — you just drew the biggest land animal on Earth, and it came out adorable.
Common mistakes to avoid
Drawing the trunk too thin
A skinny trunk is the number one elephant wobble — it turns the mighty trunk into a sad garden hose. The trunk should start thick at the face, about a third of the head's width, and taper gradually.
If yours went thin, don't erase: just draw a new outer line to widen the base and let the old line disappear under the gray crayon later.
Making the ears too small
Tiny ears make an elephant look like a gray hippo with ambitions. The ear should be nearly the size of the head — bigger than feels polite.
Extend the ear outline outward in a bigger leaf shape from the same starting point. Elephant ears are giant cooling fans, and drawings honor that.
Bending the legs
Legs with knees and angles make the elephant look like it's tiptoeing somewhere suspicious. Elephant legs are straight, thick columns, flat at the base.
Straighten each leg into a simple rectangle-with-rounded-corners and add toenails. Columns plus toenails equals instant elephant credibility.
Troubleshooting
"My elephant looks like a rhino"
It's almost always the ear and trunk. Make the ear dramatically bigger and the trunk longer and smoother — rhinos have small ears and a stubby face with a horn. Big ear, long trunk, no horn: unmistakably elephant.
"The trunk curve looks wrong"
Erase just the trunk and redraw it as one single S-curve from the face, drawn fast and light from the elbow. Slow, careful trunk lines wobble; quick confident ones flow. Let the tip curl gently up — an upturned trunk is also considered good luck, and studio elephants take luck seriously.
"My elephant looks sad"
Check the eye and the trunk tip. Add a white sparkle to the eye, curve the smile line up where trunk meets face, and tilt the very tip of the trunk upward. An upturned trunk tip reads as joy — it's the elephant version of a grin.
Key takeaways
- An elephant is a big potato body plus a slide-shaped trunk — two shapes carry the whole drawing.
- Keep the trunk thick at the base and let it taper gently to a soft, slightly upturned tip.
- The ear should be nearly as big as the head — a giant floppy leaf with a soft inner line.
- Legs are straight columns with rounded toenails; no knees required, ever.
- A low, sparkly eye near the trunk base gives the elephant its famous gentle look.
- Soft gray layers plus pink inner ears beat one heavy scrub of crayon every time.
FAQ
What age is this elephant drawing tutorial for? Kids 5 and up can follow along with a little help, and most kids 7+ can complete the sheet on their own. The big simple shapes make it one of our most beginner-friendly tutorials.
What colors should we use for the elephant? Soft gray with pink inner ears is the classic look. Blue-gray works beautifully too, and purple or pink storybook elephants are always welcome in the studio.
How do I make the trunk look right? Draw two gently curving parallel lines that taper as they go down, ending in a soft rounded tip that curls slightly outward. Think of a slide at the playground — smooth, curved, and fun.
Can I add tusks? Sure! Add two small white crescents peeking out near the base of the trunk. Keep them short and rounded for a friendly look — our cute cartoon elephant works perfectly well without them too.
Keep drawing! 🐘
If today's elephant has your artist ready for a whole safari, our step-by-step drawing book is the studio's top pick — 320 animals taught in the same easy 6-step style, from savanna giants to pocket-sized friends. Add a soft set of colored pencils and a big sketch pad with room for big animals, and the drawing habit takes care of itself.
Get the book on AmazonAnd there stands your elephant — huge, gentle, and one hundred percent fridge-worthy. Every big brave shape you drew today makes the next drawing easier, so keep that pencil moving. Draw a baby elephant next to this one holding its tail, and come back tomorrow for a new tutorial.
More tutorials: All tutorials · How to draw a lion · How to draw a giraffe · How to draw a hamster