How to draw a puppy — easy step by step drawing ideas
If you're looking for puppy drawing ideas that a small artist can actually finish, you've fetched the right tutorial. Learning how to draw a puppy is one of the most requested lessons in our studio — and happily, a puppy is just a circle, an egg, two floppy ears and a tail that won't stop wagging. Everything else is enthusiasm.
Here's my promise: by the end of this tutorial you'll have a genuinely adorable sitting puppy built from shapes you already know how to draw. No art degree, no special supplies, no pressure. We go one small step at a time, each step builds gently on the last, and there's a picture under every step so you can check your drawing as you go.
I've taught this exact sequence to kindergartners, to grandparents, and to one dog-obsessed seven-year-old who now draws a puppy on every piece of homework. Everyone leaves with a puppy they're proud of. So sharpen a pencil, find any piece of paper, and let's draw the waggiest, floppiest, most lovable pup you've ever seen.
⏱️ Time: 15–20 minutes
⭐ Difficulty: beginner — great for kids 5+
✏️ Materials: pencil, eraser, paper, brown and pink crayons or markers
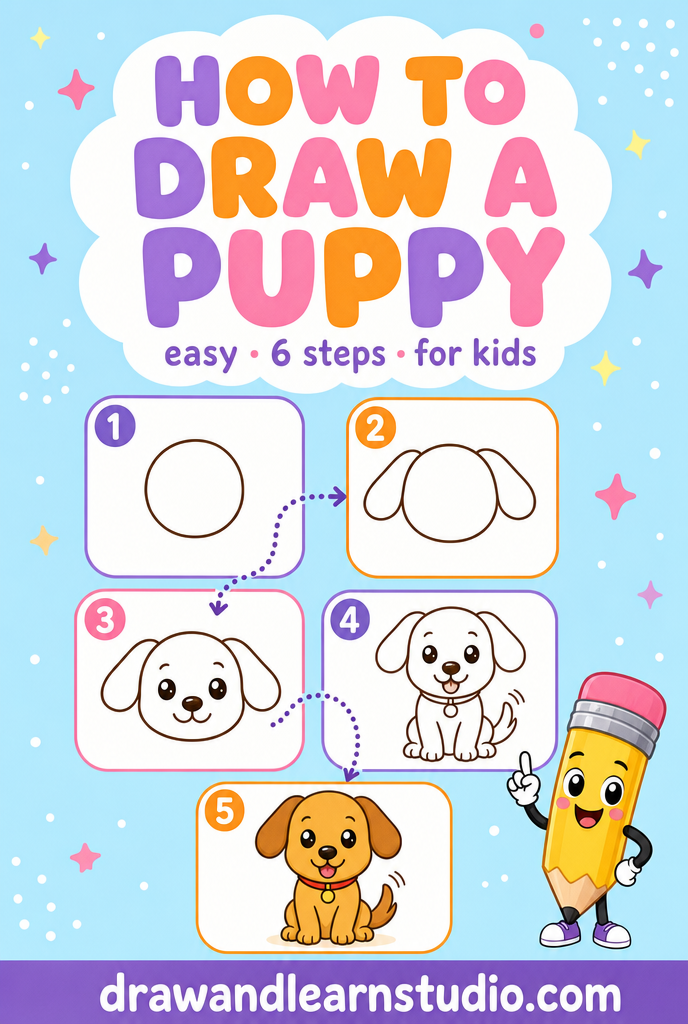
Puppy drawing ideas: the 6 easy steps
Step 1 — Draw the head

Start with a big round circle in the upper middle of your paper. Press lightly! This first circle is scaffolding, and parts of it will be gently erased later. A slightly lumpy circle is completely fine — puppies are slightly lumpy creatures, especially the good ones.
Make the circle bigger than feels natural. In cute cartoon drawing the head does most of the work, so a generous head instantly makes everything that follows look right. Leave plenty of paper below for the sitting body, the paws and one very important tail.
Step 2 — Add the floppy ears

On each side of the head, draw a long floppy ear hanging down — like two soft oven mitts draped over the top of the circle. Start each ear high on the head, let it flow down past the middle of the face, and round it off at the bottom.
Floppy ears are the single most puppy-ish feature there is, so be generous with them. Long and droopy reads as "beagle who loves you"; short and perky starts drifting toward kitten territory, and that's a different tutorial.
Step 3 — Draw the body

Under the head, draw a plump rounded body — like an egg sitting on its wide end, tucked snugly under the chin. In cute-style drawing the body should be about the same size as the head or a little smaller; that proportion feels wrong and looks wonderful.
Let the head overlap the top of the body slightly. Puppies, like most adorable animals, don't need a neck worth drawing — they have a head, and then immediately a warm round tummy. The overlap gives your pup that soft, sitting, hoping-for-a-treat posture.
Step 4 — Add the legs and tail

Inside the bottom of the body, draw two short vertical lines ending in soft rounded paws — the front legs of a sitting puppy. On one side of the body, add a plump curve like a backwards C: that's the back leg folded underneath, the classic puppy-loaf haunch.
Then the best part: the tail. From the back of the body, sweep a happy curved tail upward. A thick, slightly curved tail with a rounded tip says everything a puppy needs to say. If you like, add two or three tiny motion lines beside it — instant wag.
Step 5 — Give it a face

Time to bring your puppy to life. Draw two big round eyes in the middle of the face, a little lower than feels correct — features placed low leave a big round forehead, and big foreheads are the universal baby-animal cuteness signal. Fill the eyes in dark but leave a tiny white sparkle circle in each. Around one eye, draw a soft round patch outline — the classic puppy birthmark that adds instant character.
Below the eyes, add a big rounded button nose, then a happy open mouth: a wide U-shape with a little tongue poking out. Finish with a blush circle on each cheek. The open mouth and tongue are what separate "dog" from "puppy who just heard the word walk."
Step 6 — Finish and color

Go over your favorite lines with darker pencil pressure or a fine marker, and gently erase the leftover scaffolding — especially the bits of head circle hiding under the ears and the body line under the tail. Watch the puppy pop off the page as the construction lines disappear; it's the most satisfying ten seconds of the whole tutorial.
Then color! Warm tan with a cream muzzle and tummy, a brown patch and brown ears is the classic scheme. But a golden pup, a gray pup, a spotted dalmatian pup or a completely imaginary blueberry-colored pup are all equally correct. A pink tongue and pink blush cheeks push the cuteness straight into kawaii territory.
Common mistakes to avoid
Putting the ears on top
Pointed ears on top of the head turn your puppy into a cat or a fox faster than you can say "woof." Puppy ears start high but hang down the sides of the face, soft and floppy.
If your ears ended up pointy, don't start over — draw a rounded, droopier ear over each one and erase the points. The eraser is a drawing tool, not an apology.
Making the head too small
A small head on a big body reads as "realistic dog," and realistic dogs are much harder to make cute. For this style, the head should be at least as big as the body — bigger is even better.
Before you draw the body in step 3, hold your pencil against the head to measure it. If the body you're planning is more than one head tall, shrink it. Your future puppy thanks you.
Pressing too hard too early
Dark, heavy lines in steps 1–3 are nearly impossible to erase cleanly, and this drawing depends on scaffolding disappearing at the end. The first steps should be whisper-light — light enough to erase with two swipes.
Save the confident dark strokes for step 6, when you know exactly which lines deserve them. Light lines are drafts; dark lines are decisions.
Troubleshooting
"My puppy looks like a cat"
Check the ears first — they should hang down floppy, not point up. Then check the nose and mouth: a puppy nose is a big rounded button, and an open smiling mouth with a tongue is pure dog. Fix those and the bark comes right back.
"The eyes look scary instead of cute"
Make them bigger, rounder, and add a white sparkle to each. Scary eyes are usually small, narrow or sparkle-free. And double-check the mouth — an open happy U-shape with a tongue keeps the whole face friendly.
"My lines are wobbly"
Every artist's lines are wobbly at pencil-speed; confidence comes from repetition, not talent. Try drawing each curve a little faster — slow, careful strokes wobble more because your hand micro-corrects the whole way. And remember the fur forgives: a wobbly outline just looks fluffy.
Key takeaways
- A puppy is a circle, an egg, two floppy ears and a wagging tail — shapes every beginner already owns.
- Big head, big sparkly eyes, button nose and a tongue: the unbeatable puppy formula.
- Ears hang down the sides, soft and floppy — never pointed on top.
- One patch over one eye adds instant character; two become a raccoon.
- Draw light until step 6 — scaffolding lines must erase cleanly at the end.
- Draw it twice — puppy number two will amaze you.
FAQ
What age is this puppy drawing tutorial for? It works beautifully for kids 5 and up with a little help, and children 7+ can usually follow the six steps on their own. A puppy built from a circle and an egg is wonderfully forgiving for beginner adults too.
How do I make the puppy look cute instead of realistic? Make the head big — as big as the body or bigger — and the eyes large with a white sparkle. Add floppy ears, a patch over one eye and an open happy mouth with a little tongue, and the cuteness takes care of itself.
What materials do we need? Just a pencil, an eraser and paper. Tan, brown and pink crayons make the final step extra fun, but a pencil-only puppy is still a great puppy.
My puppy looks like a cat. Help? Check the ears and the nose. Puppy ears are long floppy flaps hanging down the sides of the head, not pointed triangles on top, and a puppy's nose is a big rounded button rather than a tiny triangle. An open mouth with a tongue seals the deal.
Keep drawing! 🐶
If your young artist is hooked, our step-by-step drawing book is the top pick in our studio — 320 animals taught in the same easy 6-step style as this tutorial. Pair it with a chunky set of washable markers and a spiral sketchpad (spiral bindings lie flat, which little hands love), and quiet afternoons take care of themselves.
Get the book on AmazonYou did it! One circle, two floppy ears and a wagging tail later, there's a puppy grinning up at you from the page. Stick it on the fridge, draw it a bone tomorrow, and remember: every artist you've ever admired started exactly like this — one round, floppy, wonderful puppy at a time.
More tutorials: All tutorials · How to draw a hamster · How to draw a duck · How to draw a cat