How to draw a bunny — easy step by step drawing ideas
If you're hunting for bunny drawing ideas that actually work for small hands, hop right in — this is the most-loved tutorial in our studio. Learning how to draw a bunny is wonderfully simple, because a cute bunny is really just one soft round shape wearing two long ears and an enormous amount of charm.
Here's my promise: by the end of this tutorial you'll have a genuinely adorable bunny built from shapes you already know how to draw. We go one small step at a time, each step builds gently on the last, and there's a picture under every step so you can check your drawing as you go. No art degree, no special supplies, no pressure.
I've taught this exact sequence to five-year-olds, to grandparents, and to one entire kindergarten class the week before Easter — that room produced forty-two bunnies and precisely zero tears, which remains a studio record. So sharpen a pencil, find any piece of paper, and let's draw the softest, roundest, most lovable bunny you've ever seen.
⏱️ Time: 15–20 minutes
⭐ Difficulty: beginner — great for kids 5+
✏️ Materials: pencil, eraser, paper, gray and pink crayons or markers
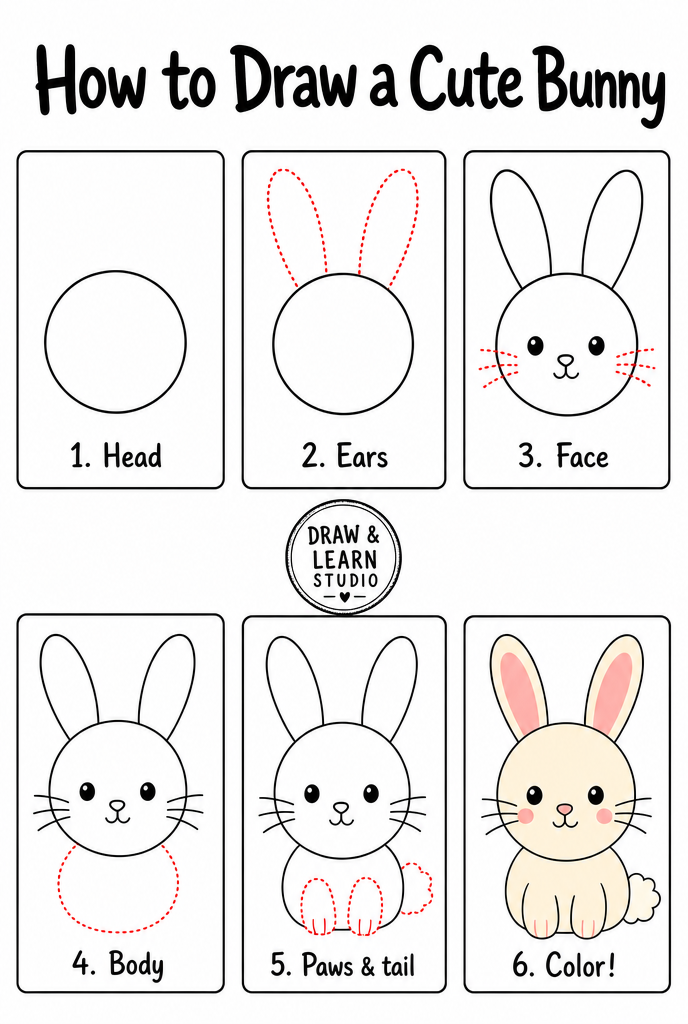
Bunny drawing ideas: the 6 easy steps
Step 1 — Draw the body

Start with one big soft rounded shape in the middle of your paper — a plump oval that's a little wider at the bottom, like a marshmallow relaxing. Press lightly! This single shape is the bunny's head and body together; cute bunnies, like fresh bread rolls, do not bother with necks.
Make it bigger than feels natural, and leave room above it — the ears that come next are tall and need headroom. If your shape leans a little or bulges on one side, congratulations: real rabbits are also asymmetrical, especially when they're sitting on their own foot.
Step 2 — Add the ears

On top of the head, draw two long upright ears. Each ear is a smooth elongated oval — wide in the middle, rounded at the tip — standing tall and leaning just slightly apart, like a happy letter V. The ears should be nearly as tall as the body itself; bunny ears are the whole silhouette, so be generous.
Start each ear on the curve of the head, not floating above it. One ear can tilt or flop a little if you like — a slightly bent ear adds instant personality, like a beret. But keep at least one ear proudly upright, or the drawing starts reading as "very small dog."
Step 3 — Give it a face

Time to bring the bunny to life. Draw two big round eyes in the middle of the face, sitting a little lower than feels correct — features placed low leave a big round forehead, and big foreheads are the universal baby-animal cuteness signal. Fill the eyes in dark but leave a tiny white circle uncolored in each; that sparkle is the difference between "drawing of a bunny" and "bunny that would like a carrot, please."
Between and just below the eyes, add a tiny rounded nose. From the bottom of the nose, drop a short line that splits into two small curves — the classic bunny mouth. Finish with two blush circles on the cheeks and, if you like, two little whiskers per side, sweeping gently outward.
Step 4 — Add inner ears and paws

Inside each ear, draw a smaller matching oval — the inner ear. Keep it centered with a rim of outer ear all the way around, like a slice of bread inside a slightly bigger slice of bread. These inner shapes get colored pink at the end, and they're half the bunny's charm.
Then, at the bottom front of the body, add two little front paws: each one a small rounded bump, sitting side by side like two shy dumplings. Tiny paws under a big soft body make the whole drawing look like it's politely waiting for a treat.
Step 5 — Add the tail and feet

On one side of the body, low down, add the famous tail: a small circle drawn with short, fluffy, cloud-like strokes — a pom-pom that came free with the bunny. Don't make it smooth; the scribbly fluff is the entire point.
Then, at the bottom of the body beside the front paws, add two soft back feet — each one a longer rounded shape pointing forward, like little slippers. Bunnies sit on their back feet, so let them peek out from under the body, flat and content.
Step 6 — Finish and color

Go over your favorite lines with darker pencil pressure or a fine marker, and gently erase the leftover scaffolding — especially the bits of head curve hiding behind the ears and any body lines crossing the paws. This is the most satisfying ten seconds of the whole tutorial: the construction lines vanish and suddenly there's a bunny sitting on your paper.
Then color! Soft gray with pink inner ears, a pink nose and a white tummy is our studio classic. But brown, white, black-and-white patches or a completely imaginary mint-green bunny are all equally correct. Deepen the blush circles on the cheeks and your bunny officially becomes the cutest thing on the fridge.
Common mistakes to avoid
Putting the ears on the sides
Ears that grow out of the sides of the head turn your bunny into a puzzled goat. Bunny ears live on top of the head, close together at the base, reaching for the sky.
If your ears ended up too low, don't start over — draw new ones higher on the head and erase the old ones. The eraser is a drawing tool, not an apology.
Making the ears too short
Short ears read as "hamster," and while hamsters are lovely (we have a tutorial for those too), they are not what we're after today. Bunny ears should be nearly as tall as the body itself.
Hold your pencil against the body to measure before you draw: each ear should reach about three-quarters of a body-height tall. When in doubt, go longer — nobody has ever looked at a bunny and thought "too much ear."
Pressing too hard too early
Dark, heavy lines in steps 1–2 are nearly impossible to erase cleanly, and this drawing depends on scaffolding disappearing at the end. The first steps should be whisper-light — light enough to erase with two swipes.
Save the confident dark strokes for step 6, when you know exactly which lines deserve them. Light lines are drafts; dark lines are decisions.
Troubleshooting
"My bunny looks like a cat"
It's almost always the ears — cat ears are short triangles, bunny ears are long ovals. Lengthen and round the ears and the whiskers stop mattering. Also check the nose: a bunny nose is a small rounded shape, not a sharp triangle.
"The face looks worried"
Worry lives in high eyebrows and a downturned mouth. Skip eyebrows entirely, curve the mouth gently upward, and enlarge the white sparkle in each eye. A bunny with sparkly eyes and blush cheeks is contractually obligated to look happy.
"My lines are wobbly"
Every artist's lines are wobbly at pencil-speed; confidence comes from repetition, not talent. Try drawing each curve a little faster — slow, careful strokes wobble more because your hand micro-corrects the whole way. And on a bunny, a wobbly outline just looks extra fluffy.
Key takeaways
- A bunny is one soft round shape wearing two long ears — the simplest silhouette in the studio.
- Ears nearly as tall as the body, growing from the top of the head: that's the whole bunny formula.
- Big eyes with sparkles, tiny pink nose, blush cheeks — the unbeatable cuteness kit.
- Inner ears that match each other matter more than outer ears that match.
- The tail is a scribbly pom-pom, not a smooth circle — fluff is the point.
- Draw light until step 6 — scaffolding lines must erase cleanly at the end.
FAQ
What age is this bunny drawing tutorial for? Kids 5 and up can follow along with a little help, and children 7+ usually manage all six steps on their own. A bunny built from one soft shape and two long ears is one of the friendliest first animals there is.
How do I make the bunny look cute instead of realistic? Keep the body one round huggable shape, make the eyes big with a white sparkle, and keep the nose tiny and pink. Big round shapes, big eyes and small features are the universal cuteness recipe.
What materials do we need? Just a pencil, an eraser and paper. Gray and pink crayons make our classic studio bunny, but white, brown, or a fully imaginary lavender bunny are all equally correct.
My bunny's ears look like antlers. Help? Make each ear one smooth elongated oval — wide in the middle, rounded at the tip — instead of two straight lines meeting at a point. Then let the ears lean slightly apart from each other, like a happy V.
Keep drawing! 🐰
If your young artist is hooked, our step-by-step drawing book is the top pick in our studio — 320 animals taught in the same easy 6-step style as this tutorial. Pair it with a chunky set of washable markers and a spiral sketchpad (spiral bindings lie flat, which little hands love), and quiet afternoons take care of themselves.
Get the book on AmazonYou did it! One soft shape, two proud ears and a pom-pom tail later, there's a bunny blinking up at you from the page. Stick it on the fridge, draw it a carrot tomorrow, and remember: every artist you've ever admired started exactly like this — one round, fluffy, wonderful bunny at a time.
More tutorials: All tutorials · How to draw a cat · How to draw a hamster · How to draw a puppy