How to draw a dinosaur — easy step by step drawing ideas
If you're hunting for dinosaur drawing ideas that won't end in frustrated sighs and crumpled paper, you've landed in exactly the right place. Learning how to draw a dinosaur is the single most requested lesson in our studio, and after teaching it hundreds of times I can tell you the secret up front: a cute dinosaur is just a bean, a banana and four tree trunks wearing a smile. That's it. That's the whole recipe.
Here's my promise: by the end of this tutorial you'll have a genuinely lovable long-necked dinosaur standing proudly on your page — the kind with a tall curvy neck, a swishy tail and an expression that says it would very much like a leaf snack. No art degree, no fancy supplies, no pressure. We go one small step at a time, and every step builds gently on the last one.
I've walked five-year-olds through this exact sequence, and I've walked their grandparents through it too. Everyone leaves with a dinosaur they want to name. So sharpen a pencil, find any piece of paper, and let's bring a very friendly giant back from extinction.
⏱️ Time: 15–20 minutes
⭐ Difficulty: beginner — great for kids 5+
✏️ Materials: pencil, eraser, paper, green and yellow crayons or markers
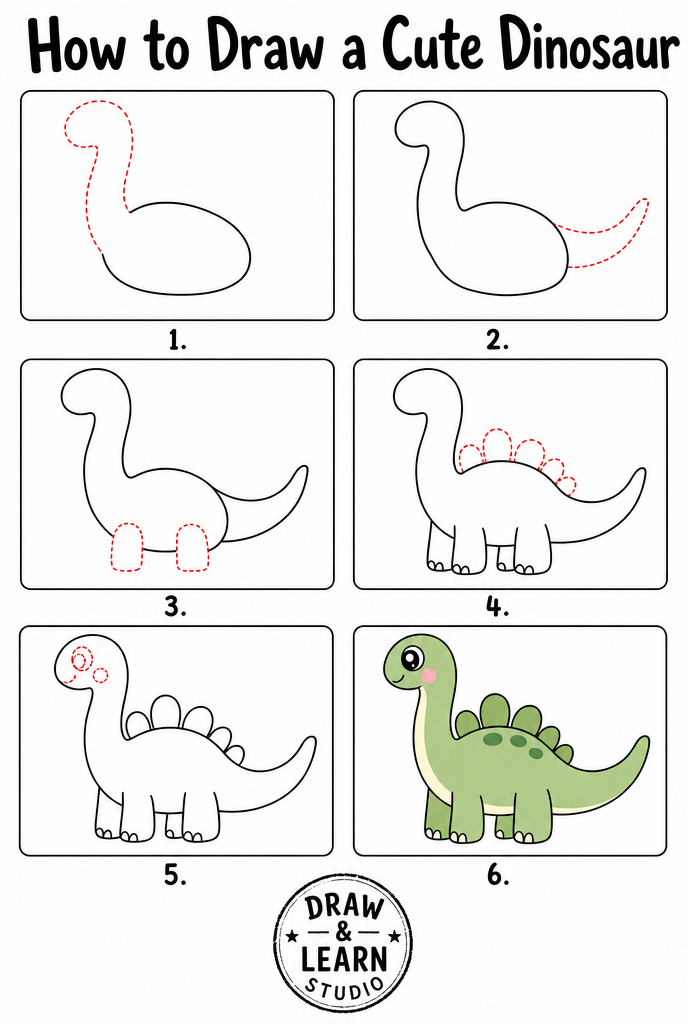
Dinosaur drawing ideas: the 6 easy steps
Step 1 — Draw the body

Start with a big rounded bean shape in the middle of your paper, tilted just a little so one end sits slightly higher than the other. Press lightly! These first lines are scaffolding, and several of them will disappear later. A lumpy bean is completely fine — dinosaurs were lumpy, and nobody complained.
Make the bean bigger than feels natural, and park it a bit low on the page. You need headroom, because in the next step a magnificent neck is going to rise out of this body like a periscope, and it deserves space to stretch. Leave room below for the legs too.
Step 2 — Add the neck and head

From the higher end of the bean, draw two curved lines sweeping up and slightly forward — think of a thick banana standing on end. The neck should be wider than you expect: skinny necks look fragile and worried, while thick necks look friendly and strong. Let the two lines get a little closer together as they rise.
At the top, close the neck off with a small rounded head — like an egg lying on its side, with a gently bumped forehead and a soft snout. The head should look almost too small for that grand neck. That's correct! Long-necked dinosaurs really did have tiny heads, and in cartoon form the contrast reads as instantly, wonderfully cute.
Step 3 — Add the tail

Go to the opposite end of the bean and draw the tail: it starts as wide as the dinosaur's back end and tapers in one long, lazy curve down to a soft point. Imagine a slide at the playground — smooth, swoopy, and fun to travel down. One confident curve beats ten careful little ones.
Let the tail rest on the ground or swish slightly upward, whichever you like. If your curve wobbles, simply draw a second line beside it and erase the first — every dinosaur artist in history has done exactly this, and the dinosaurs never minded.
Step 4 — Draw the legs

Under the body, draw four sturdy legs — two in front, two behind — shaped like friendly tree trunks. Keep them short and thick: this dinosaur is built for gentle strolling, not sprinting. The far-side legs can peek out from behind the near-side ones, drawn a little shorter so they look further away.
Finish each foot with a flat bottom and two or three tiny toenail bumps, like half-moons resting along the front edge. Those little toenails are a tiny detail with a huge payoff — they make the whole dinosaur look finished before you've even drawn the face.
Step 5 — Give it a face and details

Time to bring your dinosaur to life. Draw one big round eye on the side of the head — big is the magic word, because large eyes are what make baby animals (even hundred-million-year-old ones) look adorable. Fill it in dark but leave a tiny white circle uncolored inside; that sparkle is the difference between "drawing of a dinosaur" and "dinosaur that loves you."
Add a smiling mouth along the snout, a little nostril dot, and a soft blush circle under the eye. Then run a row of small rounded plates down the neck, back and tail — like little half-cookies standing in a line. Real paleontologists might raise an eyebrow at plates on a long-neck, but cuteness has its own science.
Step 6 — Finish and color

Go over your favorite lines with darker pencil pressure or a fine marker, and gently erase the leftover scaffolding — the bits of bean hiding under the neck and tail, the sketchy first tries. Watch the dinosaur pop off the page as the construction lines disappear. This is the most satisfying ten seconds of the whole tutorial.
Then color! Classic dinosaur green with a cream belly is always a winner, but so is teal with mint plates, or sunset orange, or purple with pink spots — the fossil record is refreshingly quiet on the subject of dinosaur colors, which means you literally cannot be wrong. Add a few ferns, a little volcano puffing a friendly cloud, or a leaf snack floating near the mouth for a storybook finish.
Common mistakes to avoid
Making the neck too skinny
This is the number one dinosaur hazard. A pencil-thin neck makes the whole animal look wobbly and anxious, like a balloon animal losing air. The fix: draw the neck at least as thick as the dinosaur's leg, and keep it thick most of the way up before narrowing near the head.
If you've already drawn a skinny neck, don't start over — just add a second line outside the first one to widen it, then erase the inner line. Your dinosaur instantly gains confidence and structural integrity.
Drawing the head too big
A big head on a long neck turns your gentle giant into a very surprised snake. The head should be small — roughly the size of one of the feet — with most of the face taken up by that one big eye.
Before you draw it, lightly mark how big the head should be. It will feel too small. It's correct. A tiny head atop a grand neck is the exact silhouette that makes people say "awww" involuntarily.
Pressing too hard too early
Dark, heavy lines in steps 1–3 are nearly impossible to erase cleanly, and this drawing depends on the bean outline vanishing under the neck, tail and legs. The first steps should be whisper-light — light enough to erase with two swipes.
Save the confident dark strokes for step 6, when you know exactly which lines deserve them. Light lines are drafts; dark lines are decisions.
Troubleshooting
"My dinosaur looks like a giraffe"
Funny you should mention it — we have a tutorial for that too. The difference is in the tail and the posture: give your dinosaur a long, thick, swooping tail (giraffes have little rope tails) and curve the neck backward slightly instead of straight up. Rounder body, thicker legs, and you're firmly back in the Jurassic.
"The legs look stuck on"
This happens when the legs start below the body outline instead of overlapping it. Erase the belly line where each near-side leg attaches, so body and leg share one continuous edge. Suddenly the legs grow from the body instead of hanging off it.
"My lines are wobbly"
Wonderful news: dinosaurs are prehistoric, and nobody alive can prove their outlines were smooth. If a wobble truly bothers you, try drawing faster — slow, careful strokes wobble more because your hand micro-corrects the whole way. One quick confident curve almost always lands better.
Key takeaways
- A cute dinosaur is one bean body, one banana neck, a slide-shaped tail and four tree-trunk legs.
- Thick neck, tiny head — the contrast is where all the charm lives.
- One big sparkly eye placed low near the snout does most of the cuteness work.
- Draw light until step 6 — the bean outline must erase cleanly under the neck and legs.
- Toenail bumps and back plates are tiny details with a huge finished-look payoff.
- No one knows what color dinosaurs were, so every color you pick is scientifically unchallengeable.
FAQ
What age is this dinosaur drawing tutorial for? It works great for kids 5 and up with a little help, and children 7+ can usually follow the six steps on their own. Beginner adults enjoy it too — the friendly rounded shapes are very forgiving.
What kind of dinosaur is this? It's a friendly long-necked dinosaur inspired by the Brontosaurus family, with optional back plates that add a hint of Stegosaurus charm. The same steps work for any cute cartoon dinosaur.
What materials do we need? Just a pencil, an eraser and paper. Green, teal and yellow crayons make the final step extra fun, but a pencil-only dinosaur is still a great dinosaur.
My dinosaur's neck looks weird. Help? Make it thicker than feels natural and curve it like a banana instead of a straight pole. A thick, gently curved neck instantly reads as friendly and strong.
Keep drawing! 🦕
If your young artist is hooked, our step-by-step drawing book is the top pick in our studio — 320 animals taught in the same easy 6-step style as this tutorial. Pair it with a chunky set of washable markers and a spiral sketchpad (spiral bindings lie flat, which little hands love), and quiet afternoons take care of themselves.
Get the book on AmazonYou did it! One bean, one banana neck and a swishy tail later, there's a dinosaur beaming up at you from the page — the friendliest extinction survivor in history. Stick it on the fridge, draw it a fern for dinner tomorrow, and remember: every artist you've ever admired started exactly like this — one wobbly, wonderful dinosaur at a time.
More tutorials: All tutorials · How to draw a hedgehog · How to draw a whale · How to draw a lion