How to draw a dolphin — easy step by step drawing ideas
Looking for dolphin drawing ideas that don't end in frustrated sighs? You're in the right place. Dolphins look impressively hard to draw — all those smooth curves and that perfect leap — but here's the secret I tell every kid in my workshops: a dolphin is really just one big banana shape with fins. Once you see it that way, learning how to draw a dolphin becomes one of the most satisfying beginner drawings there is.
Dolphins were the most requested animal in our studio this month, and I get it. They're friendly, they're clever, they seem to smile all the time, and a leaping dolphin instantly makes any drawing feel joyful and alive. The first time I taught this lesson, a seven-year-old told me her dolphin "looked like it was really jumping," and honestly, that's the whole goal of this tutorial.
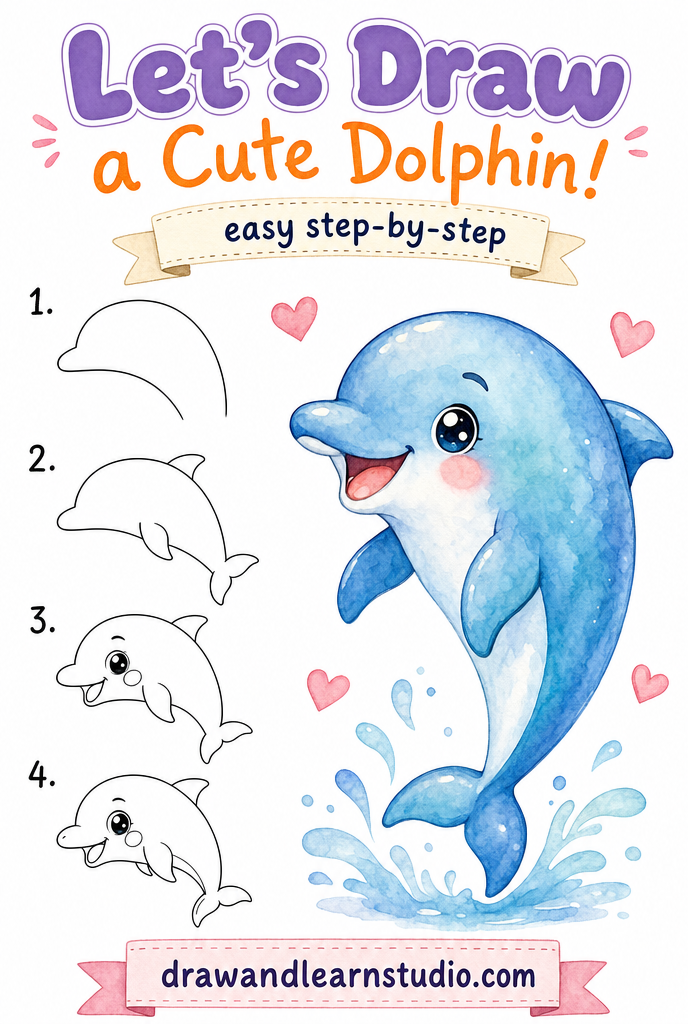
We'll build our dolphin in six easy steps, following the sheet below panel by panel. Along the way I'll share my favorite pro tips, the classic mistakes to sidestep, and quick fixes for the wobbles that happen to everyone. Pencil ready? Let's dive in — pun absolutely intended.
⏱️ Time: 15–20 minutes
⭐ Difficulty: beginner — great for kids 5+
✏️ Materials: pencil, eraser, paper, blue and gray crayons or markers
The 6 steps to a cute dolphin drawing
Step 1 — Draw the banana body

Start with a big, gentle banana shape curving across your paper — thick in the middle, tapering at both ends, tilted upward like the dolphin is mid-leap. This one curve is the whole secret of the drawing: get a happy banana and the rest of the dolphin practically draws itself. Keep the lines light and sketchy for now.
Give yourself room! A dolphin that fills most of the page is much easier to add fins and a face to than a timid little one squeezed into a corner. If your first curve feels stiff, draw the same banana three times fast without erasing — loose repetition beats careful straining every time.
Step 2 — Add the snout

At the higher end of the banana, add the dolphin's famous bottle-shaped snout: two short lines coming out of the head that meet in a soft, rounded tip, like the spout of a tiny teapot. Keep it short and stubby — a snout that's too long turns your dolphin into a swordfish with opinions.
Right where the snout meets the head, you can add a gentle curve for the dolphin's "melon" (the round forehead — that's the real name!). That little bump is what gives dolphins their sweet, intelligent look.
Step 3 — Dorsal fin and tail

Add the curved dorsal fin on top of the back, like a little wave rising from the body, leaning backward. Then, at the tail end of the banana, draw the fluke: two rounded triangles spreading out like a bird in flight. The tail is what sells the leap, so let it flare out with confidence.
Fins look best slightly curved rather than straight-edged — think of a comma, not a triangle. If your fin comes out too pointy, just round off the tip and nobody will ever know.
Step 4 — Flippers and belly line

Add one flipper on the side of the body, shaped like a little curved leaf pointing down and back. If you want to be fancy, a second flipper can peek out from behind the body on the far side. Then draw a long, smooth line inside the body from chin to tail, following the banana curve — that's the belly line that splits the dolphin's back from its lighter tummy.
The belly line is a quiet hero: it adds instant dimension, gives you a natural boundary for coloring, and makes the dolphin look sleek instead of flat. Keep it gentle and parallel to the back — no zigzags needed.
Step 5 — Give it a happy face

One round eye placed just above where the snout meets the head — dot it, then leave a tiny white sparkle if you're feeling fancy. Then the best part: the smile. Draw the mouth line from the tip of the snout curving up into the cheek, and your dolphin gets that famous friendly grin dolphins seem to be born with.
Add a little blush circle under the eye for extra cuteness, or eyelashes for a glamorous dolphin. The eye and smile are where the personality lives, so play around — a small change in the mouth curve is the difference between "gentle smile" and "up to something."
Step 6 — Finish and color

Darken your favorite lines, erase the construction sketch underneath, and color your dolphin: classic blue-gray on top, soft white or cream on the belly below your belly line. Light layers of crayon blend better than one heavy scrub, and a touch of lighter blue along the back adds a shine effect.
For the full leaping-dolphin scene, add a few curved water splash lines under the body, a couple of droplets in the air, and maybe a wavy ocean line below. Sign your masterpiece — artists sign their work, and this definitely counts.
Common mistakes to avoid
Making the body straight instead of curved
A straight-bodied dolphin looks like a submarine with a smile. The curve IS the dolphin — it's what makes it look like it's leaping and alive.
If your dolphin came out stiff, add a slightly deeper curve to the belly line and tilt the tail up a touch. Even a small extra bend brings back the motion.
Drawing the snout too long
It's tempting to keep going, but a long pointy snout tips your dolphin into swordfish territory. The snout should be short — about the size of the eye-to-forehead distance.
Easy fix: round off the tip and thicken the base slightly. A stubby snout with a rounded end always reads as "friendly dolphin."
Forgetting which way the fins lean
Fins that lean toward the head make the dolphin look like it's swimming backward through time. Dorsal fin and flippers both sweep back toward the tail, the way water would push them.
If a fin went the wrong way, erase just its outline and re-draw it mirrored from the same base point — no need to touch the body at all.
Troubleshooting
"My curve looks lumpy, not smooth"
Smooth curves come from speed, oddly enough — slow, careful lines wobble more. Sketch the banana shape with three quick, light passes and then pick the best line to darken. Drawing from the elbow instead of the wrist smooths things out immediately.
"The tail looks like a mess"
Tails get overworked fast. Erase the tail area completely, then draw just two simple rounded petals meeting at a point — like a two-leaf clover on its side. Two shapes, no details. Simple tails beat complicated tails every time.
"My dolphin looks sad"
Almost always a mouth problem: a straight or downward mouth line reads as gloomy. Curve the mouth line upward into the cheek and add the little blush circle — instant mood transformation. Raising the eye a tiny bit toward the smile helps too.
Key takeaways
- A dolphin is one big banana curve plus fins — nail the curve and you've nailed the drawing.
- Keep the snout short and rounded; long and pointy drifts into swordfish territory.
- All fins sweep backward toward the tail — it's the detail that makes the drawing look "right."
- The belly line adds instant dimension and gives you a clean boundary for coloring.
- A low, round eye and an upward-curving mouth are the recipe for a happy dolphin face.
- Splash lines and droplets turn a floating dolphin into a leaping one in ten seconds.
FAQ
What age is this dolphin drawing tutorial for? Kids 5 and up can follow it with a little help, and around age 7+ most can work through the sheet on their own. It's also a lovely, relaxing draw for adults and doodlers of all levels.
What colors should we use? Classic dolphins are blue-gray on top with a white or cream belly. But pink dolphins genuinely exist (look up the Amazon river dolphin!), so purple, teal, or rainbow dolphins are all officially endorsed by nature.
How do we make it look like it's jumping? Tilt the banana body upward, sweep the fins back, and add two or three curved splash lines beneath the tail. Motion comes from the tilt and the splash, not from extra detail.
My dolphin looks more like a shark. Help? Round everything: rounder snout, rounder fin tips, and add the big friendly smile. Sharks are all points and dolphins are all curves — softening the shapes moves you from "ocean menace" to "ocean friend" fast.
Keep drawing! 🐬
If today's dolphin sparked something, our step-by-step drawing book is the studio's top pick — 320 animals taught in the same easy 6-step style, from ocean friends to jungle crews. Add a tin of colored pencils and a thick doodle pad that can handle enthusiastic coloring, and you're set for a summer of drawing.
Get the book on AmazonAnd that's your dolphin — leaping, smiling, and hopefully headed straight for the fridge gallery. Every smooth curve you drew today makes tomorrow's drawing easier, so keep the pencil moving. Draw a pod of three, give them names, and come back tomorrow for a new tutorial.
More tutorials: All tutorials · How to draw a ladybug · How to draw a kitten · How to draw a unicorn