How to draw a lion — easy step by step drawing ideas
If you're collecting lion drawing ideas that won't end in frustrated sighs, you've found your pride. Lions are my favorite "brave" animal to teach, because under all that magnificent mane a lion is really just a circle wearing a fluffy collar — and I've watched five-year-olds roar with delight when theirs comes together on the first try. Learning how to draw a lion feels like a big-kid achievement, but the secret is that it's barely harder than drawing a sun.
I still remember teaching this one to a small workshop group on a rainy afternoon: one boy announced that lions were "only for good drawers." Twenty minutes later he had drawn three — a sleepy lion, a surprised lion, and one he described as "the king of the fridge." That's the magic of the mane: it's so forgiving that every wobble just looks fluffier, and every lion comes out with its own personality.
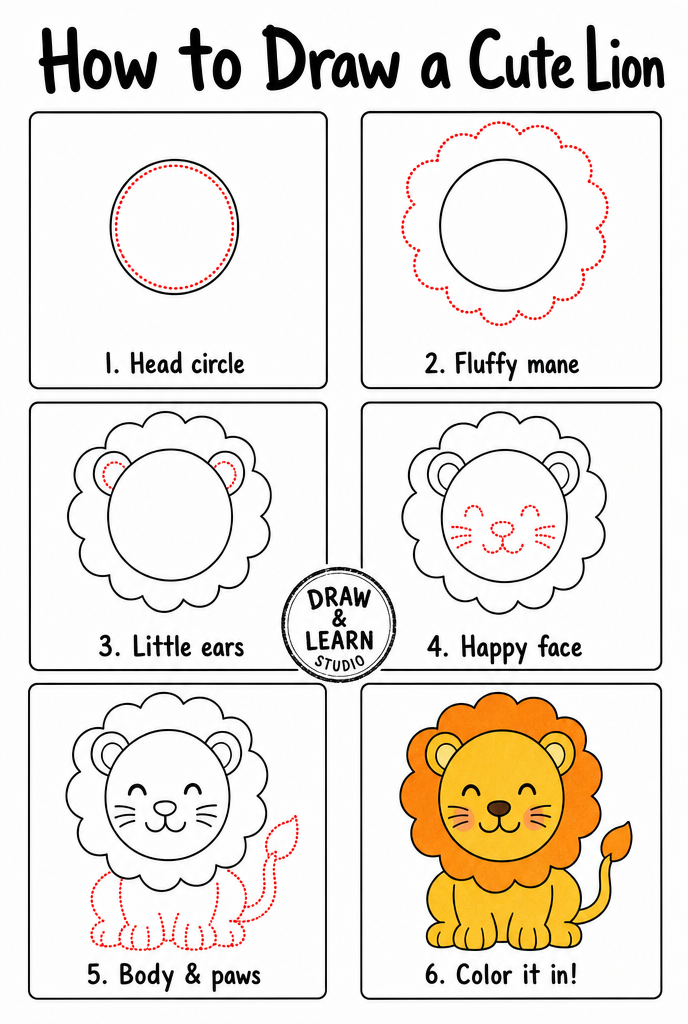
In this tutorial we'll build our lion in six easy steps, exactly like the practice sheet below. I'll share the pro tips I use in real workshops, the mistakes I see most often (and how to dodge them), and quick fixes for when things go sideways. Grab a pencil and something golden, and let's draw.
⏱️ Time: 15–20 minutes
⭐ Difficulty: beginner — great for kids 5+
✏️ Materials: pencil, eraser, paper, yellow and orange crayons or markers
The 6 steps to easy lion drawing ideas
Step 1 — Draw the head circle
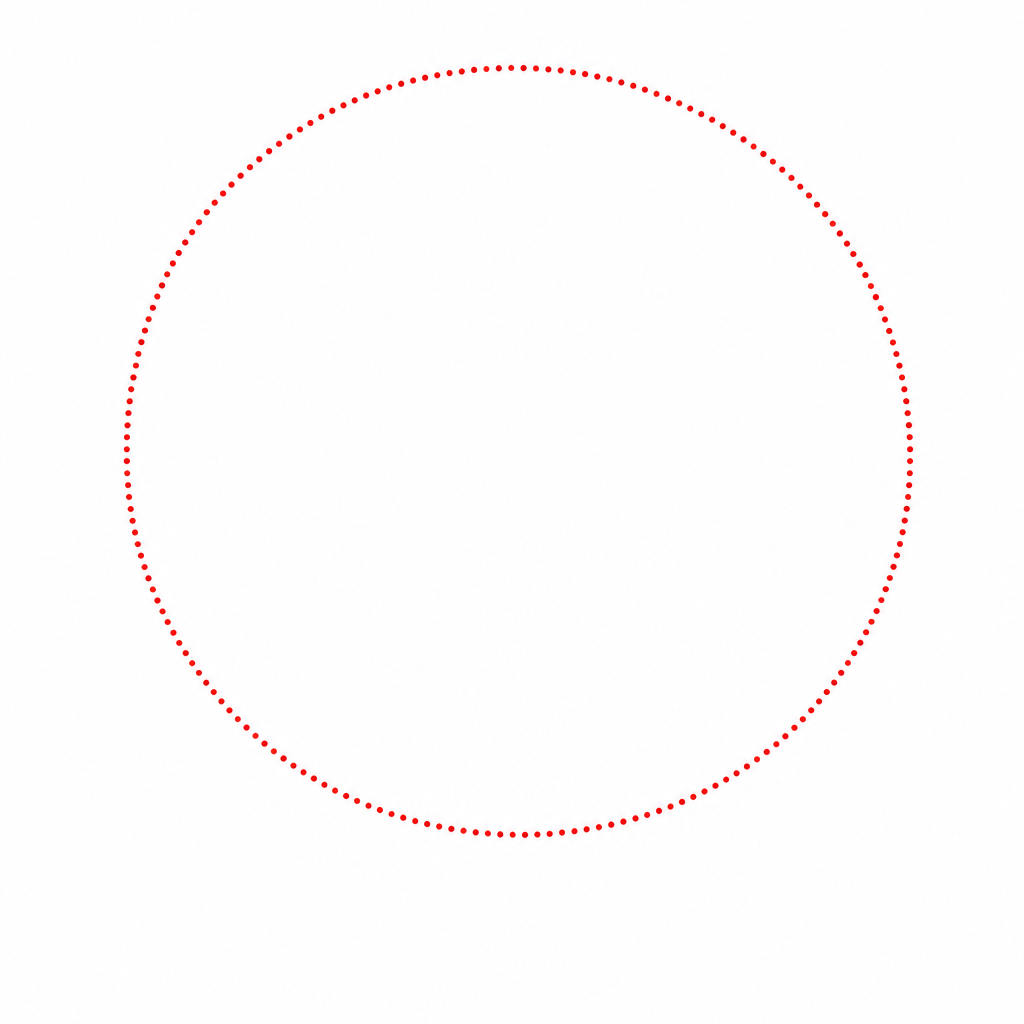
Start with one big, light circle in the middle of your paper, sitting a little above center so there's room for the body later. This circle is the lion's face, so make it generous — a roomy face means space for big friendly eyes and a proper smile. Keep your pencil whisper-light; nothing in this step is permanent.
Don't stress if your circle leans a little egg-shaped. Real lions have slightly squarish faces anyway, and the mane we're about to add will hide almost the entire outline. This is the most forgiving first step in animal drawing.
Step 2 — Add the fluffy mane
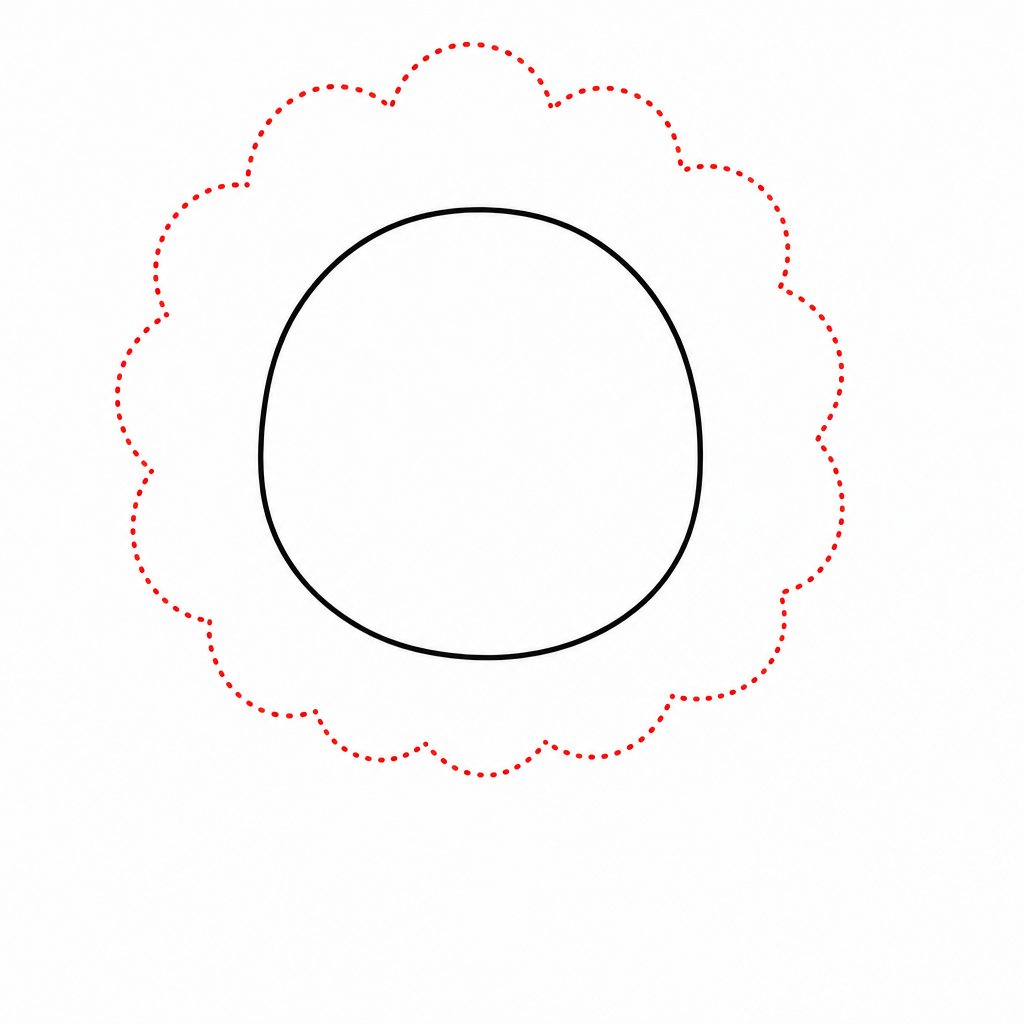
Draw a second, bigger circle around the head — but instead of a smooth line, make it a ring of connected fluffy bumps, like a scalloped sun or a cloud wrapped around the face. Aim for bumps about the size of your thumbnail: big enough to look bold, small enough to fit ten or twelve around the ring.
Here's the wonderful secret of lion drawing: the wobblier the bumps, the fluffier the mane. This is the step where nervous artists relax, because it's literally impossible to get wrong. Let the bumps vary in size and lean in different directions — that's what real fur does.
Step 3 — Add the little ears
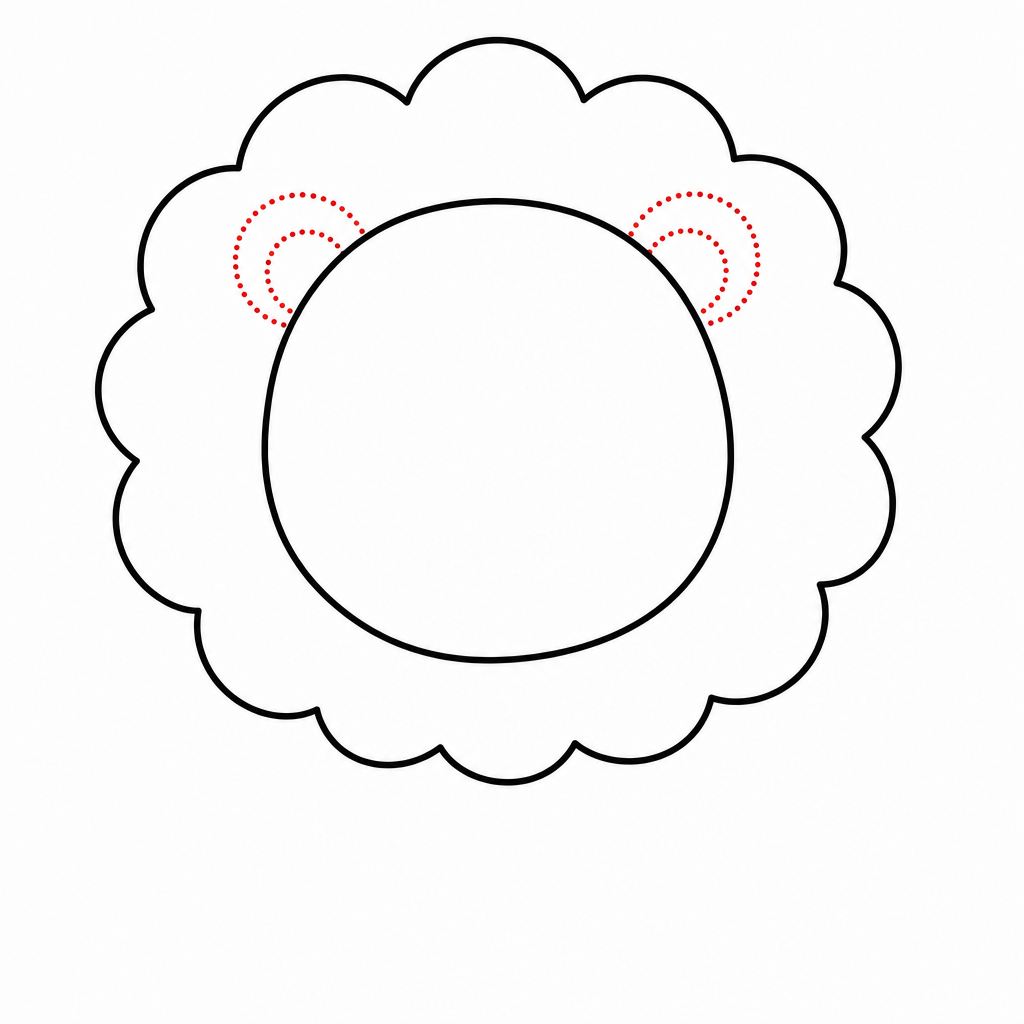
Tuck two small half-circle ears into the top of the mane, one on each side, peeking out between the bumps. The ears should sit on the head circle itself, with the mane fluffing up behind them. Keep them small — lion ears are surprisingly tiny compared to the whole fluffy production around them.
Add a smaller curve inside each ear to give it depth. This little double-line detail takes two seconds and instantly makes the ears look soft and real instead of stuck-on. Position both ears at the same height so your lion doesn't look like it's tilting its head — unless you want a curious head-tilt lion, which is also adorable.
Step 4 — Draw the happy face
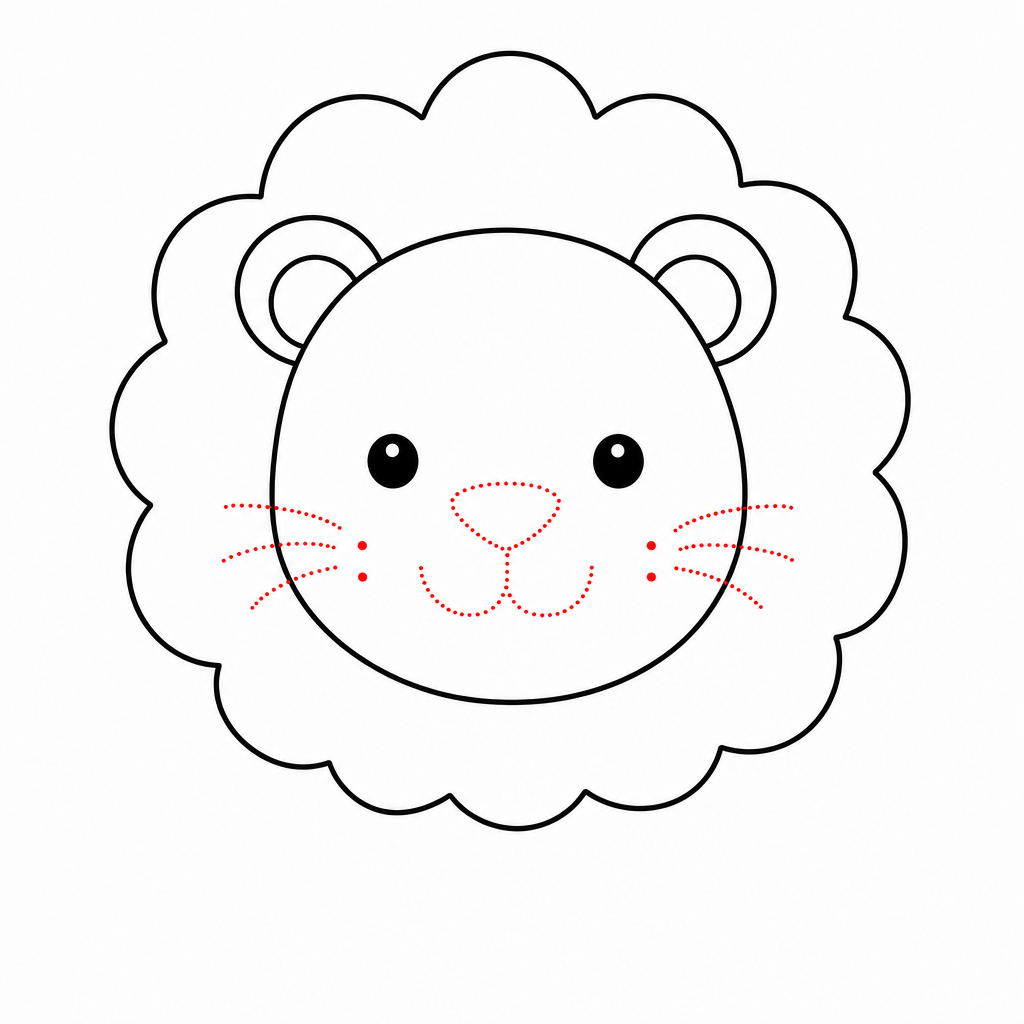
Now the personality arrives. Give your lion two round dot eyes in the middle of the face, a small triangle nose below them, and two curved lines swooping down and out from the nose to make the classic muzzle smile. Add three tiny whisker dots on each cheek and you're done.
Keep the whole face cluster low and centered — faces drawn too high make the lion look startled. Big eyes low on the face read as "cuddly cub"; smaller eyes higher up read as "wise king of the savanna." Try both on scrap paper and let your artist choose their lion's mood.
Step 5 — Add the body and paws
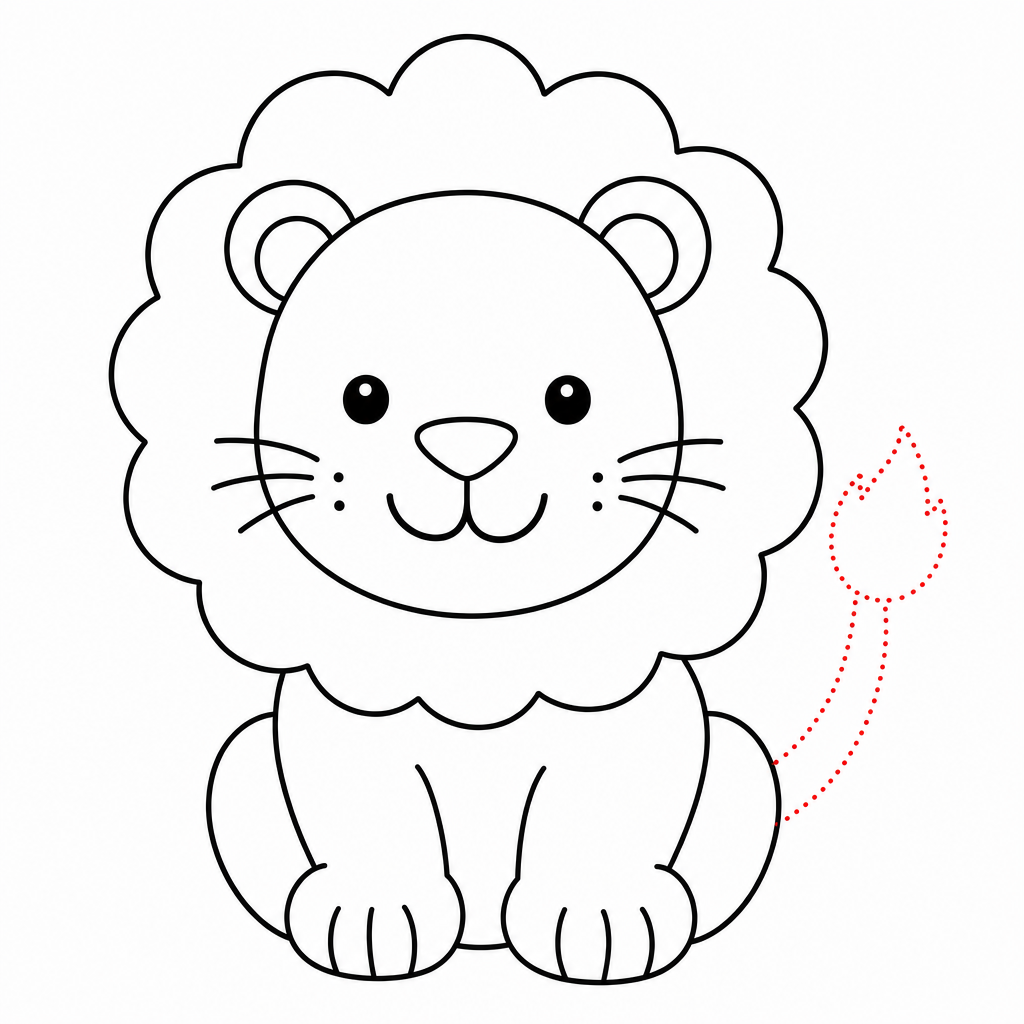
Draw a rounded rectangle body below the mane, about as wide as the head circle and a little shorter than the mane is tall. Add two front paws — simple ovals side by side at the bottom — and a tail curving up from one side, finished with a fluffy tuft shaped like a little flame.
Sitting lions are the friendliest pose and by far the easiest: the body just peeks out from under all that mane. Split each paw with two short lines to suggest toes. If your artist wants a lying-down lion, stretch the body sideways instead and let the paws point forward.
Step 6 — Finish and color
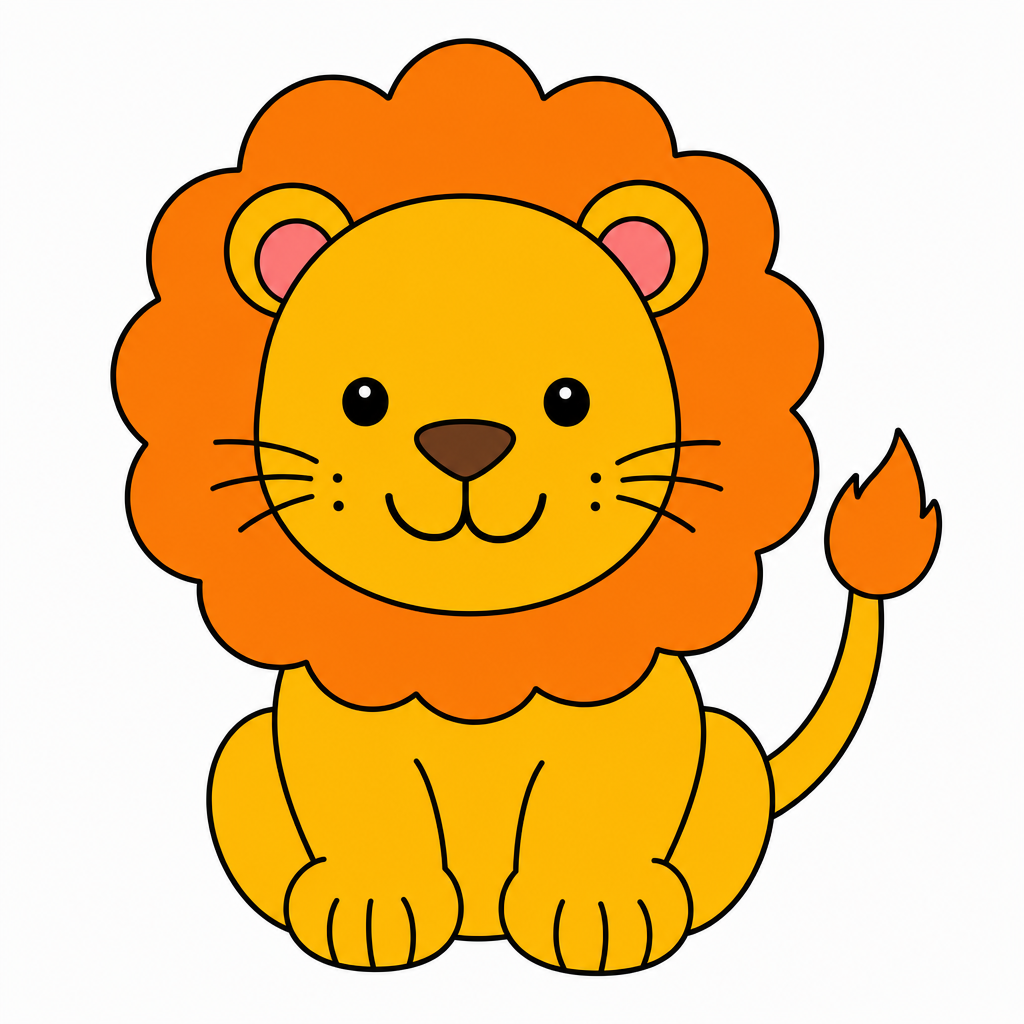
Darken your favorite lines, erase the light scaffolding underneath, and bring out the colors: golden yellow for the face and body, warm orange for the mane and tail tuft, and a rosy pink for the inner ears and cheeks. Press gently in layers — two light passes of crayon look smoother than one heavy scrub, and the paper stays flat.
Want to level it up? Leave a tiny white shine spot in each eye, and add a few short orange strokes inside the mane bumps so the fur looks layered. A patch of green grass or a little yellow sun in the corner gives your lion a home. Sign your name — every finished drawing deserves a signature.
Common mistakes to avoid
Making the mane bumps too pointy
Sharp, spiky mane bumps turn your friendly lion into an alarmed hedgehog or an angry sun. The mane should look like cloud fluff, not like flames — round every bump like the top of a lowercase "m".
If the spikes have already happened, don't erase the whole ring. Just draw a second bumpier line slightly outside the first and make the new one your keeper; the extra line underneath reads as fur texture once it's colored.
Drawing the face too high
When the eyes and nose float in the top half of the circle, the lion looks permanently startled, and there's no room left for the smile. The face cluster should sit in the lower two-thirds of the head circle.
The fix is cheerful: a face drawn too high just needs a bigger chin. Extend the head circle downward a touch and redraw the smile lower — the mane will absorb the old outline without a trace.
Pressing too hard too early
Dark, heavy pencil lines in steps 1–3 are nearly impossible to erase, and every lion needs a little adjusting along the way. Sketch light, like the pencil is barely awake, and save the bold lines for the very end.
If the lines are already dark, press a kneaded eraser (or a regular one, gently rolled) onto them instead of rubbing — it lifts graphite without tearing the paper or smearing your lion into a gray cloud.
Troubleshooting
"My mane bumps are all different sizes!"
Perfect — that's exactly what fur does. Uneven bumps look fluffy and hand-made in the best way. If one bump is truly enormous, split it in two with a tiny notch and it disappears into the crowd.
"The two ears look uneven"
Turn the paper upside down — your brain stops auto-correcting the familiar view and you'll see instantly which ear needs a nudge. Grow the smaller ear rather than shrinking the bigger one; erasing into the mane makes gaps.
"My lion's colors smeared when I colored the mane"
Orange marker over yellow marker bleeds if the yellow is still wet. Color the yellow face and body first, let it dry a minute, then do the orange mane — or use crayon for the mane, which sits happily on top of anything.
Key takeaways
- A lion is just a circle wearing a fluffy scalloped collar — the mane hides every wobble.
- Keep the ears small and the face low in the circle for that friendly cub look.
- Sketch every step lightly first, then darken only your favorite lines at the end.
- Round mane bumps mean "fluffy"; pointy bumps mean "startled hedgehog" — round them off.
- Color yellow first, let it dry, then add the orange mane so nothing smears.
- Drawing the same lion three times is the fastest way to get visibly better today.
FAQ
What age is this lion drawing tutorial for? The six-step version works for ages 5 and up with a little help, and kids around 7+ can follow the sheet on their own. Adults looking for relaxing drawing ideas are very welcome too.
How do I make the mane look fluffy? Draw the mane as a ring of connected bumps, like a scalloped sun, instead of one smooth circle. Uneven bumps look fluffier, so relax your hand and let them vary in size.
What materials do we need? Just a pencil, an eraser, paper, and yellow and orange to color with. Crayons are the most forgiving for young kids; markers make the boldest, brightest lions.
My child says their lion looks like a sunflower. Help? That usually means the mane bumps are too pointy and the face is floating too high. Round the bumps off, add the two little ears, and draw the face low in the circle — the lion appears instantly.
Keep drawing! 🦁
If your young artist is hooked, our step-by-step drawing book is the top pick in our studio — 320 animals taught in the same easy 6-step style as this tutorial. Pair it with a chunky set of washable markers and a spiral sketchpad (spiral bindings lie flat, which little hands love), and quiet afternoons take care of themselves.
Get the book on AmazonThat's your lion! Whether it came out storybook-regal or wonderfully wobbly, you made the king of the jungle from a circle and some fluffy bumps — and that deserves the best spot on the fridge. Keep the sheet handy, draw a whole pride, and come back tomorrow for a new tutorial.
More tutorials: All tutorials · How to draw a frog · How to draw a ladybug · How to draw a dolphin